Ayurved Doctor

Categories
Yoga

Yoga and its benefits for Children

In today’s world yoga has become a lifestyle statement as more and more people are using it for its health and emotional benefits. Adults may have entered into an agreement to do yoga as a part of their life, but most of them are still unable to understand the importance of Yoga for their children. Yoga helps adults in reducing stress, enhancing physical strength and building a connection between mind and body, it can also benefit children in dealing with the ever growing competitive world. Even if your child can easily handle his school and competitive environment, then also Yoga can prove to be an effective physical activity to keep them fit.

Yoga being the only sport that doesn’t induce competition, it can really help kids in developing their well-being with easy pose like sun salutations and dog pose in the school itself or at any Yoga center. Although the yoga for kids and adults can be quite different, but the basics still remain the same. Whether it is used for adult or for the kid, it still emphasizes on the mind body connection. The main difference is the creativity and playfulness that are involved in the Yoga taught to the children.

Is it important for kids to learn Yoga?

When kids are asked to imitate the instructor while performing Yoga poses enhances their learning ability and teaches them to control and channelize their energy and hence focus better on other things.

Moreover the kids in today’s world are experiencing a lot of pressure in school and society and Yoga helps in relaxing them.  Numerous researches and studies have shown that yoga can successfully calm children, helps in reduction of obesity, enhances concentration, and helps in maintaining health conditions and getting relief from irritating bowel syndrome and headache. Yoga also helps children with eating disorder by lowering their preoccupation with food and also helps them in relieving from various physical and mental disorders.

Choose the right instructor for your kid

If your child is interested in taking yoga lessons, try looking for a program or session from an experienced instructor who has been training yoga for kids. Verify the instructor’s experience in handling the children of your child’s age. Also have a look at the goal and other details of the class before enrolling your child. Review the activities and make sure that you are comfortable with the activities involved in the class, size of the class and the environment. Make sure to contact and explain instructor all the details if your child is suffering from any kind of medical condition and ask him/her about the way in which he/she will be dealing with your child.

Yoga session for Children

A typical yoga session for children, mainly starts with gentle warm up routine and breathing exercises. Most of the postures that are taught to children involves gentle, non-exhaustive movements like stretching, sitting, standing, twisting, balancing, bending, etc. during each pose the child may be asked to breath in and out in the rhythm according to the activities performed. After completing a series of postures the child may be asked to lie down on the yoga mat on his back and relax, he can visualize some relaxing experience such as flying, floating in the sky, moving through the cloud, etc. as the session proceeds towards the end the child may be asked to perform re-awakening process to get up from the floor.

Some of the Yoga like Ashtanga and Bikram yoga are not recommended for children.

Safety aspects that need to be considered

There are some safety aspects that also need to be followed strictly, to avoid any injuries or trouble. The foremost requirement is finding a safe place to perform yoga. The place should have a level ground and the temperature of the room should be at a comfortable level. Use of yoga mat will help in reducing slippage. Yoga should be practiced with empty stomach. There are certain poses that puts pressure on the stomach and cause your kid to vomit if they have a full stomach. To remain on the safe side, do not allow your child to go to their yoga class after having a meal. Wait for about 2 to 4 hours in case of large meals and about an hour in case of light meal or a little snack.

Make sure that the child doesn’t over perform the postures. They should be constantly told to avoid putting pressure and keep their movement slow and steady. The poses that involves activities such as raising the leg or extending their leg above the heart or the head or inverted poses that induces pressure on the head and neck should be carried out with extreme care and should not be forced. If a child suffering from any medical condition puts up extra pressure on the head or neck, he could injure himself or complicate his medical situation. If your child is sick do not allow him to perform yoga.

After the realization of the huge influence of yoga and the advantage of it in overall growth and development of children, it is the time when yoga needs to be added as a part of the school curriculum. Many schools have already taken the initiative and others will follow the steps soon.

Categories
Ayurved Yoga

Mudras and their benefits

Mudra is basically a symbolic ritual gesture in Buddhism and Hinduism. While some of these Mudras involve the gesture of the entire body, most of them are performed with the hands and fingers. In Sanskrit mudra means a spiritual gesture and seal of authenticity. Mudras are arm, body and hand postures used in traditional Hinduism and Buddhism. Lord Buddha knew the use of the Mudras and is often seen with the spiritual gestures.

There are about 108 Mudra are used in Tantric rituals. Several mudras are also used in Indian classical dance. There are over 250 gestures in Mohiniattam and about 200 in Bharatanatyam.

Let’s have a look at some of the mudras:

Gyan Mudra or knowledge mudra

Method

Touch the tip of your thumb with the tip of your index finger and stretch out your other three fingers.

Time Duration

There is no particular specified time duration to perform this mudra. You can practice this by sitting, standing or even when lying on the bed at whatever time you please.

Benefits

As understandable by the name, it is the mudra of knowledge. It enhances the knowledge. The tip of thumb is the center of the endocrine and pituitary glands. When pressed it helps in proper functioning of the two glands.

It helps in increasing memory power and sharpens your brain. It also helps in enhancing concentration and prevent insomnia. When practiced on a regular basis, it helps in curing psychological disorders like hysteria, mental illness, depression and anger.

Prithivi Mudra or earth mudra

Method

Keep the tip of your ring finger at the tip of your thumb with the other three fingers stretched out.

Time Duration

It doesn’t have any particular specified time duration. It can be practiced by any time you want.

Benefits

It helps in reducing physical weakness. It also helps in increasing weight in weak people. It also works on the complexion of the skin and helps in imparting the glow. It also helps in keeping the body active.

Varun Mudra or Water mudra

Method:

Allow the tip of your little finger to touch the tip of the thumb and stretch out other three fingers.

Time duration:

It doesn’t have any specific time duration, it can be practiced based on user preference.

Benefits

It helps in balancing the water content in the body and prevents disease related to water. It helps in cleansing your blood and prevent gastroenteritis and muscle shrinkage.

Vayu Mudra or Air Mudra

Method:

Try to keep the index finger on the base of the thumb and press your thumb a little. Keep all other fingers straight.

Time duration:

This mudra can be practiced for about 45 minutes. It shows a considerable reduction in the severity of the disease in just 12 to 24 hours. For better result it is advised to practice it for about 2 months.

Benefits:

It helps in preventing any disease that occurs due to air imbalance. It also helps in curing arthritis, rheumatism, gout, paralysis, cervical spondylitis and catching of the nerve.

It also helps in correcting gas disorders.

Shunya Mudra or Emptiness Mudra

Method:

Keep your middle finger on the mount of the Venus and put a little pressure with your thumb.

Time Duration:

It can be practiced for about 40 to 60 minutes every day.

Benefits

It helps in relieving headache quickly, it is also helpful for deaf and mentally challenged persons.


Surya Mudra or Sun Mudra

Method:

Bend your ring finger and press it a little with your thumb.

Time Duration:

It can be practiced for about 5 to 15 minutes daily.

Benefits:

It helps in sharpening the center of the thyroid gland. It also helps in reducing cholesterol and hence helps in weight reduction. It also helps in reducing anxiety and helps in correcting indigestion.

Prana Mudra or Mudra of life

Method:

Bend your ring finger and your little finger and touch the tip of the thumb with their tips and keep the other two fingers stretched.

Time duration:

It doesn’t have any specific time duration and can be practiced any time.

Benefits:

It is a special mudra and helps in improving the power of life. It also helps in providing internal strength and helps in reduction of the clamps in blood vessels. It also helps in making one active and improves immunity. It also helps in improving your vision and reduces eye related disorders.


Apana Mudara or Digestion Mudra

Method:

Allow the tip of your middle finger and the ring finger to touch the tip of the thumb while keeping other two fingers stretched out.

Time Duration:

Practicing it daily for about 45 minutes provides appropriate results.

Benefits:

It offers great health benefits and also helps in regulating excretory system. It also helps in controlling diabetes, constipation, piles and in regulating excretion.

Apana Vayu mudra or heart mudra

Method:

Keep the tip of your middle finger and ring finger so as to touch the tip of the thumb. While the index finger is in contact with the base of the thumb stretch your little finger.

Time duration:

It can be practiced for without any time restriction. People suffering from BP or heart disease should practice it for at least 15 minutes daily for best results.

Benefits:

It helps the heart function properly and reduces vata in the body. It also helps in strengthening the heart and regularizing palpitation. It also regulates the excretory system and helps in eliminating gastric trouble.

Linga Mudra or Heat and Energy mudra

Method:

Interlock fingers of both your hands, keep the thumb of your left hand vertically straight and use the other thumb to encircle it.

Time duration:

It can be practiced at any time according to the convenience. But don’t practice it a lot as it generates heat in the body. It may also cause sweating if you practice it for a longer time.

Benefits:

It generates heat inside our body. Practitioners are advised to take milk, ghee, fruits and more water while performing this mudra. It helps in stopping the production of phlegm and strengthens your lungs. It also helps in curing cold, bronchial infection and revitalizes the body.

Categories
Yoga

Using Yoga to tackle Diabetes and hypertension

Everyone nowadays is aware of the positive effects of yoga and how it helps in dealing with various frailties. But one thing that everyone should also know is that there are some specific Yoga asana or poses that are helpful in handling specific health conditions. In this post we will discuss about the yoga poses that can help in dealing effectively with diabetes and hypertension; two most common symptoms found in youngsters due to their lifestyle.

Yoga asana or postures to deal with diabetics

The onset of chronic conditions can be prevented by daily use of Yoga. Moreover, practicing yoga postures or asana is also helpful in improving lowering blood sugar levels and insulin sensitivity while detoxifying and maintaining your internal organs. One of the most prominent reasons behind the increase of blood sugar level is secretion of stress hormones. Yoga can be of considerable help in calming stress levels and keeping check on your blood sugar levels. Some of the Yoga asana that can help you in keeping a tap on your blood sugar levels are:

Ardha matsyendrasana

This asana is considered as a boon for the diabetics as regular and continuous practice of this posture helps in simulating beta cells present in the pancreas to emit more insulin. This posture is targeted at simulating pancreatic cells and secretion of insulin helps in soothing blood sugar levels and hence helps people who are suffering from diabetes.

Gomukhasana

Gomukhasana is one posture that offers an incredible amount of benefit. It helps in simulating different organs. It induces relaxation, stimulates, kidneys, helps in stretching muscles in the knees, buttocks and lower side of the back. Regular practice of Gomukhasana also massages pelvic and reproductive organs. These all round effect of the asana is considered beneficial for tackling diseases like diabetes, sexual malfunctions and high blood pressure.

Paschimottanasana

Paschimottanasana benefits abdominal organs. It helps in simulating life energy and manipura chakra, helps in stretching the back muscles, leg muscles and increases the blood supply. It also triggers smooth functioning of kidney and pancreas, which in turn helps in controlling weight and keep a tab on the diabetes.

Sarvangasana

Any Yogic asana that mildly compresses an organ beneath the intestine, liver, abdomen and pancreases simulates them to function properly as expected, which in turns keep the blood sugar level to normal. Sarvangasana also gently carries out massage of the parathyroid and thyroid while you perform the chin-lock. This gentle massage smoothens the blood flow circulation to these glands and helps them in efficiently performing their tasks.

There are several other asanas like Malasana, Halasana and Adho Mukho Snavasana that consists of postures that can be helpful to people suffering from diabetes or to someone who is aiming to keep diabetes at bay.

Yoga postures that can help in curbing Hypertension

Hypertension is one of the most widely growing concerns among the present generation.  So, if you are suffering from high blood pressure then these yoga asanas may help you in keeping a check on it.

Shavasana

Shavasana or the corpse pose offers uncanny relaxation and relieves the muscle tension. It also helps in releasing stress and is excellent to lower the blood pressure.

Paschimottanasana

Hypertension has adverse effect on the body, it contract your arteries, which may also result into some serious issues like stroke or even heart attack. The bending posture like paschimottanasana helps in providing flexibility to the arteries and helps in lowering down the blood pressure.

Balasana

The prefect way to remove hypertension is to free your mind of unnecessary chaos. Hypertension is the result of the uneven thought process, anxiety and anger. Balasana helps you in flushing out all the negative thoughts and toxins, thus helps in considerable reduction of stress.

Adho mukha svanasana

This posture can help you in efficiently removing stress and tension from your back and shoulder. The asana is also known as down facing dog because of its appearance.

Anulom Vilom Pranayam

This is actually not a pastor, but a pranayama or breathing technique. This is quite great in calming your mind and reliving your stress. The regular and controlled breathing helps in lowering down the anxiety level and downgrades the heart-rate which in turn lowers your blood pressure. Research claims that pranayama helps in balancing the endocrine and immune system.

Setubandhanasana

This yoga posture is also popularly known as the ‘Bridge pose’. Setubandhasana is made of two conjoined words; ‘Setu’ meaning bridge and ‘asana’ meaning posture. This asana helps in improving blood circulation, reduces stress, induces concentration and relieves one of tension.

Other asanas like Sukhasana also induce a salutary effect for people suffering from Hypertension and helps in relieving stress from your body.

Categories
Yoga

Meditation and Ayurveda

Meditation is the practice of training the individual mind to induce consciousness. It is a state of mind in which individual acknowledges the content, i.e. memories of the past or ideas for the future without being identified with them. Once an individual removes the limitation of the past and future, he/she can achieve the balance of psychological, physical and emotional state. Dr. Joan Borysenko, a leading researcher in the field termed meditation as ‘Pleasantly anchored in the present moment’.

Meditation is a type of mind & body exercise. It actually refers to a number of techniques that promotes relaxation, helps in building internal energy and induce compassion. It also helps in attaining physical and mental calmness, enhancing health and treatment of diseases.

Meditation is the art of attaining mental discipline to get afar the impulsive mind into a deeper state of calmness and relaxation. There are numerous meditative principles that emphasize on different psycho-physical and spiritual practices with several goals like the attainment of higher consciousness, increasing focus, self-awareness, creativity or just a peaceful mind.

Concept of mind as per Ayurveda

Ayurveda treats mind as an atomic element consists of three qualities known as Trigunas which are; Tamas, Rajas and Sattva. The whole concept is quite similar to Vata Dosha as it is very unstable and fast. It can navigate from past to future in a fraction. The turmoil in the mind makes a person restless and a calm, composed mind is the budding ground for creative work and healthy body.

What do we need for meditation?

It is always good to have a calm and quiet location. The comfortable posture is also important as it allows you to focus on one thing at a time. Try to focus your thought on one thing or object, don’t let your thought wander and try to concentrate on this one object/goal.

Which time is perfect for meditation?

The best time for meditation is early morning before sunrise. This time is known as Brahma Muhurta in Ayurveda. At this time nature is completely quiet and there is no disturbance or noise.

To meditate,  sit calmly in a comfortable position and close your eyes, think of any object and try to concentrate all your thought on the same with your incoming and outgoing breath. At first there will be thoughts coming from all directions, allow your mind to wander. Slowly the thoughts will start decreasing and your mind will become quieter and will reach a stage when there will be only calmness and quietness in the mind.

Different types of meditation

  • Concentrative meditation:

It facilitates on usage of one’s own breath, a picture or sound to quieten the mind. Ayurveda and Yoga both believe in a strong connection between one’s breath and mind. A calm mind facilitates slow, regular and deep breaths. When your mind focuses on breath it easily gets absorbed in the rhythm of your breathing pattern.

  • Mindful meditation :

This is one of the prominent Buddhist meditations. It allows you to acknowledge the contents around you like images, thoughts, sound, smell, etc. without getting identified with the content. The person practicing this sits quietly and lets the mind wander without reacting to the content.

  • Transcendental Meditation:

This type of meditation has origins with Lord Krishna. There are also references of this type of meditation in Buddhist works. The knowledge of meditation was passed on for ages from Shankaracharya to Brahmannada Saraswati. But it was Maharshi Mahesh Yogi, who made it famous worldwide. It is based on sound meditation and each person is provided with a beej mantra according to his/her thought.

  • So Hum meditation:

This meditation uses the natural sound that is produced during breathing process. Once a person started concentrating on the sound of his/her breathe, slowly the mind starts to become more and more focused.

  • Vipasana Meditation:

This meditation practiced was taught by Buddha. The word Vipasana actually means to see things clearly. This meditation aims at cleansing the body and mind by removing toxins and impurities. In this meditation, a person is asked to maintain complete silence for a week and search for the inner soul.

  • Zen meditation:

This meditation allows you to relax your body and open your mind to discover your inner self. After days of practice you will be able to reach a meditative state where your heartbeat will slow down and your breath will become shallow. Thoughts will be quarantined and you will be able to concentrate consciously on the current moment.

Categories
Yoga

Anantasana : Yoga Pose

Anantasana is known as side-reclining leg lift posture, since this asana is performed by reclining on one side of the body and lifting one leg upwards.

Procedure for Anantasana

  1. You should lie down on the ground on your right side. You should actively press through the right heel, flexing the ankle and using the outside of your foot to stabilize yourself in that position. If you still feel that your position is not stable, you can brace the soles against a wall.
  2. You should stretch the right arm straight outwards along the ground and parallel to the chest, so that there is a long straight line from the heels to the fingertips of your hands. You should now bend the right elbow, lift your head slightly and support the head with your left palm. After that, you should slide your elbow away from the chest for stretching the armpit, still holding the head.
  3. You should rotate the left leg externally, so that your toes are pointing towards the ceiling. You should bend and draw your knee towards your chest. You should reach across towards the inside of your left leg to take hold of your left big toe with the index and middle fingers. You can secure this grip by wrapping your thumb around the other two fingers. If you are not able to reach up and grip your toe, you can use a yoga strap, loop it around the ankle and hold on to the strap. You should extend the left leg upwards in the direction of the ceiling.Anantasana Yogasana
  4. The left leg raised is likely to angle slightly forward and the top portion of the buttocks will drop back. You should firm up the sacrum against your pelvis, creating a type of the fulcrum that will be helpful in moving the left leg slightly backwards to maintain the perfect perpendicular position.
  5. You should press through both your heels actively. You can stay in this position for 30 seconds and extend it to one minute or more later on with practice. After holding the posture, you can slowly release the left leg, exhaling and take a few slow breaths.
  6. You should now turn on to your left side and repeat the same process with the right leg.

Benefits of Anantasana

Anantasana stretches the backs of the legs and the sides of the chest, while toning up your belly.

Preparatory and Follow-Up Asanas

The preparatory asanas for Anantasana are Parighasana, Supta Padangustasana and Utthita Trikonasana. The follow-up asana is Adho Mukha Svanasana.

Categories
Yoga

Ananda Balasana : Yoga Pose

Ananda Balasana is termed as happy baby posture and it is quite a simple asana. In fact, this asana has got its name, since most babies take up this posture involuntarily, when they are lying on their backs. Masters of yoga go to the extent of saying that we do lots of asanas when we are young babies, even without any awareness that they are very good asana poses that increase the flexibility of the body and keep the body in healthy condition. However, we usually forget all those asanas or postures one by one as we grow and are forced to learn them afresh at a later stage from a yoga master. Ananda Balasana is one such asana.

Procedure of Ananda Balasana

  1. You should lie on your back, preferably on a folded blanket. You should exhale and bend the knees towards and into our abdomen.
  2. You should inhale and hold the outsides of both feet with both hands. Your knees should remain open slightly wider than your chest. You should now push your knees slowly upwards until they reach your armpits.
  3. You should now position each one of your ankles directly over the knees, with your shins remaining perpendicular to the ground. You should flex the legs through your heels. You should push your feet gently up into your hands, even while pulling the hands down for creating more resistance.Ananda Balasana-Yogasana
  4. You should coax and move your thighs inwards towards your chest and press them down towards the ground through the chest, while lengthening your spine. You can release the tail bone also towards the ground. The base of your skull should be lengthened away from the back of the neck for maximum stretching in this position.
  5. You can hold this pose easily for 30 seconds and extend it upto one minute later. After completing the asana, you can slowly release your feet back to the ground while exhaling. You should rest in this lying position, taking a few breaths slowly before getting up.

Benefits of Ananda Balasana

The anatomical focus of this asana is on the hips. Ananda Balasana stretches the inner groins as well as the back spine gently. It calms the brain and is quite helpful in relieving fatigue and stress.

Precautions and Contraindications for Ananda Balasana

Persons suffering from knee injuries and pregnant women are not advised to perform this asana. People with neck injuries can do this with a thick folded blanket as the support for the head. Beginners can use yoga straps to hold their feet, if they are unable to reach them with their hands.

Preparatory and Follow-Up Asanas

You can perform Balasana and Virasana before Ananda Balasana and follow it up with Adho Mukha Svanasana.

Categories
Yoga

Salabhasana : Yoga Pose

Salabhasana is known as locust or grasshopper posture, since Salabha means locust or grasshopper in Sanskrit. It is grouped with Dhanurasana and they are described as baby backbends. Even though it appears simple and unassuming, it is actually quite challenging and interesting than what it looks like. Usually, Salabhasana is considered as a good counter-stretching asana for Paschimottanasana, Sarvangasana and Halasana.

Procedure for Salabhasana

  1. Place a folded blanket to pad your pelvis and ribs from the ground. You should lie down on the blanket with your belly on the blanket. The arm should be kept to the sides of your body, with the palms up and forehead resting on the ground. You should turn your big toes inwards so that your thighs get rotated. The buttocks should be kept firm to enable your coccyx to be pressed to your pubis.
  2. You should raise your head, arms, upper chest and legs away from the floor or the blanket. Your body will be resting on your belly, front pelvis and lower ribs. You should ensure that you keep your buttocks firm and the legs are fully stretched. The big toes should remain turned to face each other.
  3. You should raise your hands until they are parallel to the floor and stretch them actively backwards. You can imagine that some weight is pushing down on the upper arms and you are pushing up against this particular resistance. The scapulas or shoulder blades should be firmly pressed into your back.Salabhasana Yoga Pose
  4. You can look either directly forward or tilt your head a little upward, but you should ensure that the chin does not get pushed forward, putting pressure on the nape of the neck. You should keep the back of the neck long and only lift the base of your skull.
  5. You can remain in this posture between 30 seconds to one minute. You should exhale and return back to your lying position. You can perform this asana a few times again, with a gap of one or two minutes. The focus of Salabhasana is not on how high you are able to lift up, but on how much you are lengthening your spine.

Benefits of Salabhasana

Salabhasana improves the flexibility in your back and strengthens the muscles in your lower back, spine, backs of your arms and legs and your buttocks. It stretches the thigh, belly, chest and shoulders. It improves digestion and massages the internal organs. It is particularly useful for persons suffering from sciatica and lower back pain, since it provides great relief for both conditions, if practiced slowly and properly. It strengthens the arm and shoulders. It reduces fatigue. Therapeutically, Salabhasana enhances concentration, stimulates the Swadhisthana Chakra. The anatomical focus of this asana is on the neck, upper arms, upper back, lungs, lower back, hamstrings and calves and buttocks. Salabhasana relieves flatulence, indigestion and constipation. It relieves stress.

Precautions and Contraindications for Salabhasana

Persons suffering from headaches, serious back injury and neck injury should not practice Salabhasana.

Preparatory and Follow-Up Asanas

The preparatory asanas for Salabhasana are Bhujangasana, Gomukhasana, Setu Bandha Sarvangasana, Supta Virasana, Virabhadrasana I, Urdhva Mukha Svanasana and Virasana. The follow-up asanas are Setu Bandha Sarvangasana, Salamba Sarvangasana and Bharadvajasana. It is always advisable to do Salabhasana and other asanas under the monitoring and guidance of an expert yoga master. You can avoid injuries when a master is supervising you. You should also do this asana only on a folded blanket and never on the ordinary floor.

Categories
Yoga

Sirasasana : Yoga Pose

Sirasasana is standing on the head posture. Since you use your hands as support, this asana is also termed as Salamba Sirasasana or supported headstand posture.

Procedure for Sirasasana

  1. You should use a folded blanket to provide padding or cushion to your forearms and head. First, you should kneel on the floor. You should clasp the fingers of both hands together and place your forearms on the ground, with the elbows remaining at shoulder width. You should roll your upper arms forward slightly and press your inner wrists into the ground firmly. You should place the crown of your head on the ground. Beginners should press the bases of their palms together, while snuggling the back of their head against clasped hands. After gaining experience, you can open your hands and place the back of your head into your open palms.
  2. You should inhale and slowly lift your knees from the ground. Your feet should be close to your elbows with elevated heels. You should now lift actively through the top of your thighs in an inverted ‘V’ form. The shoulder blades should be firm against the back and you should lift the shoulder blades towards the tail bone to keep the chest front. This will prevent the weight of your shoulders from collapsing on your head and neck.
  3. You should exhale and lift your feet more away from the ground, with both feet together. If necessary, you can bend your knees during this time. You should lift the legs (or the thighs if you have bent your knees) in a perpendicular position to the ground, keeping the tail bone firm against the back of your pelvis. You should turn your upper thighs slightly inward and press the heels actively towards the ceiling. If you had bent the knees, you should straighten them now. The center of your arches, the center of your pelvis and the center of your crown should be in alignment.
  4. You should firm up the outer arms inwards and soften your fingers. You should continue the press of your shoulder blades against your back, while widening the shoulders and drawing them towards your tailbone. Your body weight should be evenly balanced on your two forearms. Your tailbone should continue its upward lift towards your heels. When the back portions of your legs are completely lengthened through your heels, you should maintain that lengthening and press upward through the balls of your big toes, so that your inner legs are marginally longer than the outer legs.
  5. Beginners should maintain this position only for 10 seconds. You can slowly add 5 or 10 seconds every week until you are comfortable in this posture up to 3 minutes. After a few weeks, you can add 5 or 10 seconds each day. You can stay in this position as long as you are comfortable. You should finally come down slowly while exhaling and you should not lose the lift of your shoulder blades. Both feet should touch the ground at the same time. The lifting and bringing down your legs should be smooth and not jerky. Initially, this may not be possible for beginners, but they will get perfection with constant practice. You can remain in Sirasasana even up to 20 or 30 minutes, but you should ensure that you are absolutely comfortable.
  6. After resting for 5 minutes, you should drink a cup of milk, which is very important. You should not remain for long periods in Sirasasana in summer, but you can extend the time during winter.

Sirsasana Yoga Pose

Benefits of Sirasasana

Sirasasana calms your brain and relieves stress as well as mild depression. It stimulates the pineal and pituitary glands. This asana strengthens your arms, legs, lungs, and spine. Sirasasana also tones up the abdominal organs. It is therapeutic for insomnia, asthma, sinusitis and infertility. Sirasasana is highly useful in maintaining Brahmacharya and prevents wet dreams or spermatorrhoea. It invigorates, vivifies and energizes. Memory power increases by the practice of Sirasasana. The head receives lots of blood and Prana.

Swami Shivananda of Divine Life Society, Rishikesh has mentioned that Sirasasana can cure all diseases related to eye, head, nose, stomach, throat, liver, lungs, spleen, genitor-urinary system, gonorrhoea, syphilis, deafness, renal colic, piles and diabetes. Many ovarine and uterine diseases of women get cured. It relieves symptoms of menopause. Swami Shivananda has asserted that Sirasasana, Sarvangasana and Paschimottanasana are enough to keep a person completely healthy and other asanas need not even be practiced. These three are so powerful and important, according to him.

Precautions and Contraindications for Sirasasana

Persons suffering from back injury, heart condition, headache, high blood pressure, neck injury and low blood pressure should not practice this asana. Women should avoid Sirasasana during menstruation and pregnancy. You can do Sarvangasana before Sirasasana, though a few yoga schools reverse this order.

Beginners should practice this asana only under the guidance of an experienced yoga master. Otherwise, they can initially practice this by remaining close to a wall so that they do not fall on their backs. When they rest their legs on the wall, they will not be in a perpendicular position, but it will be easy for them to come to a straight position without too much difficulty. With practice, they will be able to reach the correct position without the support of the wall.

Variation of Sirasasana

The variation of Sirasasana is Eka Pada Sirasasana or one leg headstand posture. After reaching and getting stabilized in the Sirasasana position, you should exhale and lower the right leg until it is parallel to the ground, but your left leg should be firm and remain perpendicular to the ground. You can hold this position for up to 30 seconds and lift back the right leg to the perpendicular position, inhaling. You can repeat this with your left leg for the same period.

Preparatory an Follow-Up Asanas

The preparatory asanas for Sirasasana are Sarvangasana, Adho Mukha Svanasana, Uttanasana and Virasana. The follow-up asanas are Balasana and Adho Mukha Svanasana.

Categories
Yoga

Gomukhasana : Yoga Pose

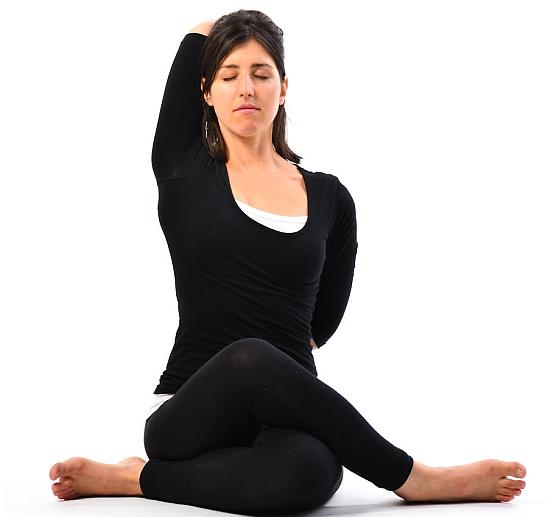
Gomukhasana is known as cow face posture, since Go means cow in Sanskrit and Mukha means face. You can do this asana easily in a sitting posture.

Procedures for Gomukhasana

  1. You should sit in Dandasana or staff posture.
  2. You should bend your left leg and bring the heel of the left leg under the right leg, close to the right hip.
  3. You should bend your right leg now over your left knee, allowing your right heel to come close to your left hip. Your right knee should be in a position directly above your left knee.
  4. You should place your palms of both hands on your feet.
  5. You should press your sitting bones onto the ground and you should keep your head straight so that the crown points towards the ceiling.
  6. You should bend your left elbow and move your left forearm to bring it behind your back.
  7. The back of your left hand should be positioned in the middle of the back, very close to the shoulder blades. Your left forearm and the fingers of your left hand should be pointing upward.
  8. You should extend your right hand over your head, while inhaling.
  9. You should bend the right elbow and bring the right elbow between your shoulder blades. The right palm should be facing your back and the fingers of your right hand should be pointing downward.
  10. You should now clasp the fingers of your left hand with the fingers of your right hand.
  11. You should pull the shoulders away from one another and experience the stretch in your shoulders. You should also open up your chest.
  12. You can remain in this posture between 10 and 30 seconds before you release your hands and come back to Dandasana.
  13. You should repeat the steps between 2 and 12 for your other side.

Gomukhasana Yoga Pose

Precautions

You should not do this asana if you are suffering from any problems in the knee, hip, neck, and shoulders.

Benefits of Gomukhasana

Gomukhasana releases the tension in your shoulders. It stretches your arms and shoulders. It opens up the chest, facilitating deeper breathing. It is also useful in the elimination of rounded shoulders. When you deepen this asana, breathing becomes easier and headaches get relieved. The anatomical focus of Gomukhasana is on your ankles, hips, thighs, shoulders, arms and chest.

Variations in Gomukhasana

You can do this asana from a sitting position, but you can perform the stretch of the upper body in standard sitting position or in Vajrasana or thunderbolt posture. If you are unable to clasp your hands behind your back, you can hold a strap between the hands. You can also pull your abdominals towards your spine, bend forward at the hips and press your chest gently to the floor. It is advisable to learn this asana and other asanas under the supervision of a trained yoga master.

Preparatory and Follow-Up Asanas for Gomukhasana

You can practice Baddha Konasana, Upavista Konasana, Virasana, Supta Virasana, Supta Padangustasana and Supta Baddha Konasana before starting on Gomukhasana. You can follow up Gomukhasana with Ardha Matsyendrasana, Garudasana, Marichyasana III, Paschimottanasana, Bharadvajasana, Upavista Konasana and Padmasana.

Categories
Yoga

Vajrasana : Yoga Pose

Vajrasana is known as thunderbolt posture, since vajra means thunderbolt in Sanskrit. It is also termed as adamantine posture. If you practice Vajrasana, you have a firm, steady pace and you cannot be easily shaken. Vajrasana renders the knees very hard. The spinal cord or Meru Danda becomes strong and firm. This asana nearly resembles the Namaz posture that Muslims adopt when they sit for prayer.


Procedure of Vajrasana

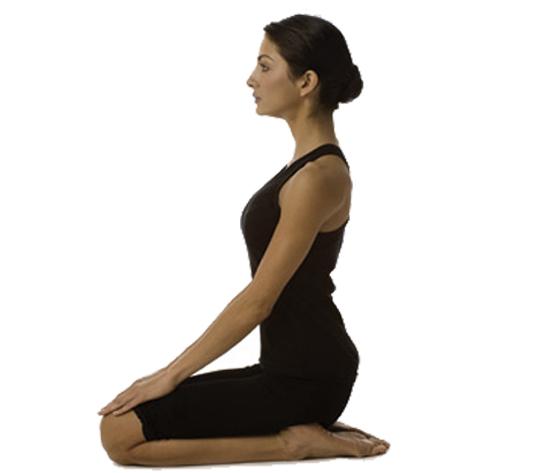
  1. Come down slowly from a standing position or Tadasana by bending your knees, but keeping your back and neck straight and erect.
  2. When your thighs touch the forelegs and the forelegs are firmly on the ground, twist your feet so that the soles support the buttocks and the feet extend beyond the buttocks, with the fingers of the feet stretching outward.
  3. The calves of the legs should touch the thighs and the part of the knee to the toe should touch the floor. The entire weight of the body is borne by the knees and ankles.
  4. When you are sitting in the proper position comfortably, place your hands on the knees, keeping the knees quite close. The back, neck and the head should be in a straight line.vajrasana Yoga Pose
  5. Initially, you may feel a little pain in the knee joints and ankle joints, but this will disappear with practice. You can massage the knee joints and ankle joints with your hands until you feel comfortable.

Benefits of Vajrasana

Vajrasana is a very good asana to counter indigestion. If you sit after taking your food in Vajrasana for about 30 minutes, the food will become well digested. Dyspeptics can derive a lot of benefit from this asana. The muscles and the nerves of the legs and thighs get strengthened by Vajrasana. If you are suffering from myalgia in your thighs, legs, knees, and toes, you can eliminate myalgia with Vajrasana. You can also use this asana as a cure for sciatica and flatulence.  Vajrasana helps in making the stomach work vigorously. Vajrasana exercises a beneficial, stimulating influence on Kanda. Kanda, a very vital part of our body is located 12 inches above our anus and the 72,000 Nadis in our body spring forth from Kanda. With practice, you can sit in Vajrasana for a long time. Yogis and siddhas use Vajrasana for meditation.

Variation of Vajrasana

You can also keep your heels separate. You can keep the buttocks and the anus between the heels and keep the legs by the sides of the two thighs.

If you keep your hand on your knees, hips, or the sides of your chest and press your buttocks firmly with the soles, with the trunk, neck and head straight and erect, it is known as Kurmasana or tortoise posture.

If you sit in Vajrasana and stretch the hands to the face level with palms facing together, while bending down slowly and lying down on the floor with the support of your hands, it is Ardha Kurmasana.

For performing Utthana Kurmasana, you should sit in the position of Garbhasana with the hands between the thighs and the calves. While you keep the feet on your thighs in Garbhasana, you keep the ankles close and one ankle over the other ankles, while pressing the head down with the hands. These asanas eliminate pain and sprains in the back.

When you take the feet towards the back, allowing the toes to touch each other, with the knees at the sides and the hands on the knee, it is known as Mandukasana or frog posture.

When you raise your knees slowly while sitting in Vajrasana, you will be performing Angushthasana, which is very helpful in maintaining Brahmacharya.

When you sit in Vajrasana and take hold of your heels with your two hands, it is known as Ananda Mandirasana.

Supta Vajrasana

Supta Vajrasana is a major variation of Vajrasana by combing Vajrasana with Savasana or sleeping posture. It is also known as Ardha Savasana. You should perform this asana only after obtaining perfection in Vajrasana, since more force and strain come on your knees in this asana. You should lie down on your back and make a finger-lock. The head should rest on your palms. At the beginning, the entire portion of your back will not be able to touch the floor and the lower portion will remain in a raised position. However, you will get perfection in this asana with practice. This asana provides all the benefits of Vajrasana. Even hunchback can be removed by this asana since the spine bends backward and becomes elastic. When you perfect this asana, performing Chakrasana becomes easier.