Ayurved Doctor

Categories
Yoga

Sasankasana : Yoga Pose

Sasankasana is also known as rabbit posture or hare posture, since Sasanka means rabbit or hare in Sanskrit. The final posture of this asana resembles a leaping rabbit or hare. However, a few other schools term this as moon posture or crescent moon posture, since Sasanka also means moon in Sanskrit.

Procedure for Sasankasana

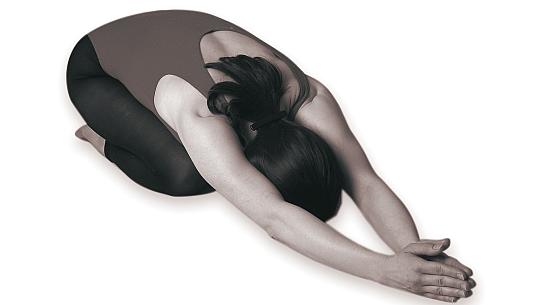
  1. You should sit in Vajrasana.
  2. You should keep your knees together on the floor.
  3. The weight of your body should be resting on your heels.
  4. The soles of your feet should be turned away from your body.
  5. You should inhale slowly, while raising both your hands straight above the head.
  6. The palms of the hands should be turned outward and the inside of your hands should be touching your ears.
  7. You should now lean backwards as much as possible.
  8. You should exhale, while bending and lowering the trunk and pelvis forward. When you are doing this, the hands should remain straight touching your ears and your seating position should be firm.
  9. You should bend forward and bring your hands and head fully forward until your hands are touching the floor and then your forehead rests on the floor.
  10. You should move your palms along the ground, so that your hands get maximum stretch.
  11. You should keep the palms together and straight, while your abdomen presses on your thighs. You can also interlock the palms and deepen the stretch of your hands.
  12. You should hold your breath and remain in this asana as long as you are quite comfortable.
  13. You should inhale slowly and return to the original position of Vajrasana, with the hands touching your ears and maintaining the seated position before repeating the asana for 2-3 more times.
  14. When you have completed this asana, you can bring down your hands and remain in Vajrasana for a few minutes.

Sasankasana yoga pose

Benefits of Sasankasana

Sasankasana provides a toned abdomen. It improves digestion and removes constipation. The spinal muscles get toned up. Sasankasana relieves neck pain. The upper back, hands and shoulders get fully stretched in this asana. It strengthens your knees and ankles. It refreshes the brain. Sasankasana can relieve many spinal problems. This asana is a very good treatment for persons with dropping the shoulders and correcting their posture. It is possible to cure slipped disc, if you practice this asana under the guidance of an expert yoga master.

Variation of Sasankasana

From your stretched position with the forehead and palms pressing the floor, you could lift your back and knees, so that your knees are in an upright position and your back is raised from the floor and inclines slightly forward, while your forehead is touching the floor. In this position, you should raise your hands until they are interlocked about your upper back. You can hold this position for 15 to 30 seconds and return to standard Sasankasana. You can also do this from a position where you are standing on your knees.

This variation of Sasankasana helps in reducing mental fatigue and refreshing the brain, since more blood gets pumped to your face and brain. Your back, spine and nervous systems obtain greater flexibility. This variation helps in curing sinus problems, chronic tonsillitis and colds. It also improves your digestion.

Categories
Yoga

Halasana : Yoga Pose

Halasana is known as plough posture, since your body will take the shape of a plough when you practise this. The Sanskrit word for plough is hala.

Procedure for Halasana

  1. You should spread a blanket on the floor and lie flat on your back. The hands should be kept at your sides on the floor with your palms touching the ground. Your legs should remain joined.
  2.  You should now lift your legs upward very slowly. The legs should remain straight without any bending and the hands should be firmly on the floor. The trunk also should not bend. You should raise your legs until they are at an obtuse angle.
  3.  From that position, you should proceed further to fold the legs over your body and lower your legs until they are away from your head and the toes touch the ground. The knees should remain straight and very close together. The back should be straight with only the neck and the head touching the floor. The thighs and legs should be in a straight line.
  4. You should press the chin against your chest and slowly breathe through your nose. The breathing should not be through the mouth.
  5. You can hold this position as long as possible.
  6.  You should slowly raise your legs and return to your original posture of lying on your back on the floor. There should be no jerk anywhere when you take your legs behind your head or when you bring them back to the original position.

Halasana Yoga pose by a lady

Benefits of Halasana

The focus of Halasana is on the thyroid. This asana calms your brain, stimulates your thyroid gland and abdominal organs. Halasana stretches your spine and shoulders. It helps in relieving symptoms of menopause. Halasana reduces fatigue and stress significantly. Halasana is therapeutically helpful for insomnia, headache, backache, infertility, and sinusitis. It tones up and nourishes the muscles of your thighs, muscles of your abdomen, and the rectal muscles. Halasana also cures chronic or habitual constipation, congestion, gulma, corpulence or obesity and enlargement of the spleen and liver. If you practice Halasana, you will feel very active and never be lazy.

Halasana tones the muscles in your back, the spinal nerves, the vertebral bones and all sympathetic nervous systems running along your vertebral column on both sides. When you do this asana, a higher quantity of blood flows through the spinal cord, muscles of the back, spinal roots of the nerves, sympathetic nerves and sympathetic ganglia, so that they get thorough nourishment. The vertebral column becomes highly elastic and soft. Further, Halasana prevents early ossification of your vertebral bones or faster degeneration of these bones. Early ossification will make you look older and the bones will become brittle and hard in this degenerative process. Halasana is a good cure for different types of myalgia or muscular rheumatism, sprain, neuralgia and lumbago also. Doing this asana under the guidance of an experienced yoga master is advisable.

Precautions and Contraindications

People suffering from diarrhoea, neck injuries, high blood pressure, and asthma should not practise this asana. Women should not perform Halasana during the menstruation period. Pregnant women can continue this asana if they have been practising it before becoming pregnant but it is not advisable. Since Halasana is an advanced asana, it is better if you become perfect in Sarvangasana before proceeding from that to Halasana, since it is an amplification of Sarvangasana.

Variations

Instead of keeping your hands in the original position, you can move them towards your legs and catch hold of the toes. You should do this also without any jerk.

One major variation of Halasana is Parsva Halasana or flank plough posture. In the Halasana posture, you should walk your feet towards your left side as far as possible, while exhaling. When you do this, one of your hips may tend to sink towards the ground. Hence, you should try and keep your pelvis in a neutral position, with the hips remaining parallel to the ground. You can remain in that position between 30 seconds and 1 minute. You can return back to Halasana position inhaling. You can now repeat this towards the right side and return back. From that position, you can release yourself from Halasana through step 6.

Categories
Yoga

Sarvangasana : Yoga Pose

Sarvangasana is a very powerful, even a mysterious asana that provides wonderful benefits. Since Sarva means all and Anga means limbs or members of our body, this posture can be termed as all members’ posture. When you perform this asana, all your body parts are engaged.

Procedure of Sarvangasana

  1. You should spread a thick blanket on the ground and practice Sarvangasana over the blanket. You should lie down flat on your back. Your legs should be close together.
  2. You should slowly lift your legs. The legs, hips and trunk should rise slowly until they are vertical to the floor. You should support your back with your two hands, one for each side, with the forearms and the elbows resting on the floor.
  3. You should press your chin against your chest, forming a firm chin-lock or Jalandara Bandha. The head, the neck, the shoulder portion and the top of the back should be touching the ground. You should concentrate on your thyroid gland lying on the front lower part of your neck.
  4. The legs should be kept straight and you should not allow the body to move to and fro or shake. The shoulders will be bearing the whole weight of your body as if you are standing on your shoulders with the support and help of your elbows.
  5. After holding the position as long as possible, you should slowly come back to the original lying down position. The forward and reverse movements of the legs should be smooth and elegant without any jerks. You can remain for 2 minutes in this asana position in the beginning, but you can later extend it to even half an hour.
  6. It is always advisable to do Matsyasana or fish posture immediately after performing Sarvangasana. You can do Sarvangasana twice a day, in the mornings and in the evenings.

Sarvangasana yoga pose

Benefits of Sarvangasana

Sarvangasana nourishes the thyroid gland properly, which has got a major role in our body metabolism, structure, nutrition and growth. When the thyroid gland is healthy, the circulatory, alimentary, respiratory, nervous, and genitor-urinary systems also function in a healthy manner. The thyroid gland operates in conjunction with the other ductless glands, like pineal gland in the brain, pituitary gland, suprarenal gland above your kidneys, testes, liver, and spleen. All these glands will suffer if the thyroid gland becomes diseased.

Sarvangasana supplies a larger quantity of blood to the roots of spinal nerves. It centralizes the blood in your spinal column and nourishes it beautifully. It keeps the spine fully elastic, making you look youthful. It prevents ossification or hardening of the bones. Sarvangasana is also helpful in maintaining Brahmacharya. It is the cheapest readily available tonic for blood, nerves and digestive system, saving your doctor’s bills. It also helps in venereal diseases like gonorrhoea and diseases of ovaries and bladder. It removes diseases of wombs and sterility. Sarvangasana also removes chronic constipation, dyspepsia and other gastro-intestinal disorders. It invigorates, energizes, rejuvenates and vivifies you and your entire body and mind.

Precautions and Contraindications

People suffering from diarrhoea, high blood pressure, headache, menstruation and neck injury should not practice Sarvangasana. This asana is an advanced asana and pregnant women should not practice it. It is better to do this asana under the guidance of an expert yoga master until you become perfect.

Variations of Sarvangasana

Sarvangasana is also known as Salamba Sarvangasana or supported all-members’ posture, since you use your hands as support while performing this. It is also possible to do it without the support of the hands and it is known as Nirlamba Sarvangasana. However, you should not attempt that until you have become perfect in Salamba Sarvangasana.

One more variation of Sarvangasana is Eka Pada Sarvangasana or one leg all-members’ posture. In this variation, after getting into the perfect Sarvangasana position, you can lower your right leg perpendicular to your body slowly until it touches the floor. You can remain in that position for up to 30 seconds and then bring the right leg back. You can then do the same with the left leg.

You can also do Padmasana while remaining in Sarvangasana position. You can deepen that posture by bending your legs towards your groin, while remaining in Sarvangasana and Padmasana positions.

Preparatory and Follow-Up Postures for Sarvangasana

You can perform Virasana and Setu Bandha Sarvangasana before doing Sarvangasana. Proceeding to Halasana from Sarvangasana is quite easy. You should compulsorily do Matsyasana after completing Sarvangasana.

Categories
Yoga

Parsvakonasana : Yoga Pose

Parsvakonasana is usually termed as Utthita Parsvakonasana or extended side angled pose. This asana is highly useful in stretching the body parts that are not usually fully stretched. This is one of the beginning asanas but you have to practise this slowly in the beginning until your body becomes accustomed to stretch fully without any strain.

Procedure for Parsvakonasana

  1. Parsvakonasana can be started from Tadasana or the mountain pose. You should stand straight with palms of both hands facing outward and both feel adjacent to one another.
  2. You should exhale slowly while separating your feet until they are separated by about three feet distance.
  3. You should now raise your hands so that they are at the sides fully stretched and parallel to the floor. In this position, your shoulders should remain wide, the feet should be kept apart and the palms facing down.
  4. You should slightly turn your left foot towards the left side, while the right foot still faces forward.
  5. You should turn the left thigh inwards until the ankle and the center of your left knee of your left foot are in a straight line.
  6. You should then turn the hip slightly towards your left leg but your chest should remain straight.
  7. You should bend the left knee over your left ankle while inhaling, so that your shin is perpendicular to the floor.
  8. The left thigh should also remain parallel to the ground with the right leg remaining straight and stretched fully from hip to ankle.
  9. You should now extend and stretch the right hand above your head on the left side of your body, with the palm facing the ground and remaining straight. The hand should be touching your right ear.
  10. You should turn your face slowly inward to look at your palm. The other hand should be touching the ankle of your left leg without taking any support from the ankle or the shoulder. The purpose of Parsvakonasana is to stretch as much towards the right side of your body as possible without feeling any discomfort.
  11. You should push your extended hand towards the ceiling forcefully, while inhaling and exhaling. You can do this stretching a few times and then return back to standing position.
  12. You should repeat the same steps with the right leg.

Parsvakonasana Yoga Pose a very useful yoga pose incase of insomnia

Precautions in Practising Parsvakonasana

You should not do Parsvakonasana if you have problems of insomnia, headaches or other conditions directly related to hypertension or high blood pressure. You should skip looking at your palm of your extended hand, if you have neck problems or neck pain, but should look straight while practicing this asana.

Benefits of Parsvakonasana

Parsvakonasana stretches out several parts of your body and helps in stretching the muscles of legs, ankles, hips, groin, abdomen, lungs, chest, shoulders and spine. The knees, legs and ankles get strengthened. Parsvakonasana enhances overall stamina by stimulating the abdominal organs. Parsvakonasana is helpful in constipation, infertility, chronic back pain, weak backs, osteoporosis and discomfort during menstruation period. It is also a very good remedy for highly painful inflammation of the sciatica nerve.

Variations of Parsvakonasana

You can use the wall to vary the posture of the asana. You can bend your arm towards the knee and the ankle instead of using the hand. This variation will stretch the inner thigh and groin to a higher degree. Another major variation of Parsvakonasana is Parivrtta Parsvakonasana or resolved side angle posture. This asana is not for beginners and hence you should practise this only after you are perfect with Utthita Parsvakonasana. In this pose, you should exhale and stretch your hand until you are able to place it on the ground next to your leg, instead of touching the ankle position in Parsvakonasana. You should twist your body and chest slightly towards both sides to increase the stretch.

Preparatory and Follow-Up Asanas for Parsvakonasana

You can practise Adho Mukha Svanasana, Supta Baddha Konasana, Prasarita Padottanasana, Supta Virasana, Supta Padangustasana, Upavista Konasana, Utthita Trikonasana, Virasana, Virabhadrasana II and Siddhasana before starting on Parsvakonasana. You can follow up Parsvakonasana with Baddha Konasana, Bakasana and Malasana. The follow-up asanas for Parivrtta Parsvakonasana are Garudasana, Gomukhasana, Bharadvajasana and Marichyasana III.

Categories
Yoga

Vriksasana : Yoga Pose

Vriksasana is termed as tree pose, since Vriksa in Sanskrit means tree. The Buddha commented once that dualities in life, such as gain or loss, pleasure or sorrow, and praise or blame will come and go in our lives like strong winds, but we should remain like a giant tree and stand firm in the midst of such winds. Vriksasana is meant to bring balance in our body and it is one of the initial asanas that should be practiced before a yoga student ventures into other asanas. Many yoga practitioners also use Vriksasana to bring themselves into normal focus after doing the other intense standing postures or asanas.

Balance of ease and effort is the most important factor in Vriksasana. If you try to hold yourself very tight in Vriksasana, the pose will become rigid and you will find it difficult to balance yourself. Further, tension will creep in both your body and mind. If you are too easy in this position, you will not be able to hold the pose, the lifted foot will slip, the supporting leg will tire quickly and the lower back area will undergo more strain when the chest slump. Hence, ideally you should energize yourself enough to hold proper alignment, while remaining soft enough so that the body stays balanced and the mind is able to focus and relax.

Procedure for Vriksasana

You can proceed to Vriksasana from Tadasana. You should shift weight onto one leg, say the left leg, with the entire sole of the left foot remaining in full contact with the ground. You should now bend the right knee and place the right foot on your inner thigh, like in a half lotus position, inhaling slowly when you move the right leg. In the initial stages, you can use your hands to place your right foot on the left inner thigh. The toes of the right foot should point directly downwards. The left foot, the center of your pelvis, the shoulders and your head should remain firm in a vertical alignment. You can raise your hands above the head along the ears with or without clasping them together or you can clasp your hands in front of your chest like the worshipping or Anjali Mudra. You can remain in this position between 20 seconds and 60 seconds. You can then return to standing pose or Tadasana while slowly exhaling. You can repeat this Vriksasana on the other leg.

Benefits of Vriksasana

Vriksasana improves body balance, poise, posture and concentration. It further increases the range of possible motion in your hip, deepens your thorax, strengthens your ankles, and tones up the muscles in your legs, chest and back. Vriksasana also strengthens your calves, thighs and spine. It stretches the inner thighs, groins, shoulders and chest. Vriksasana reduce flat feet and relieves sciatica.

Vriksasana

Precautions and Contraindications

If you are suffering from high blood pressure, you may face some risk if you raise your hands above your head. Such persons can hold the hands clasped at chest level in Anjali mudra. People suffering from low blood pressure, insomnia or headache should avoid this asana.  You should avoid leaning towards one side, rotating or bending the knee that is supporting your body outward, pushing one hip outwards, losing concentration and looking downwards.

Categories
Yoga

Prasarita Padottanasana : Yoga Pose

Prasarita Padottanasana is a forward bending asana in which the legs are kept wide. Hence, it is known as wide legged forward bending posture. After doing a few demanding asanas, especially backward bending asanas, you can do Prasarita Padottanasana to align, soothe and rebalance the body and mind. This asana is an ideal counter asana to all backward bending asanas.

Procedure of Prasarita Padottanasana

  • From a standing position, you should inhale and jump off the right foot, so that you land in a position of wide stance.
  • When you outstretch your hands, the feet should be nearly under the hands as much as possible with the feet parallel to each other.
  • You should ensure that your feet remain strong with your inner arches lifted by drawing the inner ankles up.
  • The big toes should be on the floor and outer edge of the feet firm.
  • You can draw your thighs up and engage them for the next position.
  • If possible, you can move your hands so that the palms are behind your back and the fingers of the hands clasped together. If you find this position somewhat difficult initially, you can hold your opposite elbows with your hands.
  • You should now inhale to lengthen the front portion of your body and exhale to fold forward from your hips. The back should remain straight and the chest fully open. You should slowly take the top of your head towards the floor.
  • If you have your hands clasped behind the back, the arms should also move towards the floor with the head all the way. You will be able to feel a good sensation on the backside of your shoulder blades.
  • When you are fully bent forward, you can release your head down and place the crown of the head with a lengthening neck on the floor.
  • You can move your hands from behind the back and place them close to your head on the floor on either side or move them to hold the big toes of your feet. You can also move your hands to hold the hips when the head is touching the floor or stretch your hands behind your back as far as you can move them.
  • You can maintain this pose for 5 to 10 breaths.
  • It is very important to keep the back and the front portion of your body open as long as possible. However, you should be careful that your hamstrings do not get overstretched.
  • You should inhale slowly and lift your back up by putting the pressure on your feet to come out of this posture.

Prasarita Padottanasana yoga pose

Benefits of Prasarita Padottanasana

Prasarita Padottanasana stretches the inside of your legs and your back. It opens up your hip. It also stretches your spine, chest and shoulders. It relieves mild headaches. Prasarita Padottanasana calms your mind, tones up the internal organs, provides more energy to the lungs and the heart, strengthens your legs and exercises the knee joints and hips effectively.

Categories
Yoga

Ustrasana : Yoga Pose

Ustrasana is a back bending asana. In Sanskrit, Ustra means camel and hence this asana is known as camel pose. Since many of us are not accustomed to any activity related to bending backwards, most backward bending asanas will be difficult to perform, but they are highly critical in yoga asanas, since they are the most beneficial to humans.

Procedure of Ustrasana

  1. You should first sit in a kneeling position, with legs apart by about 1½ feet the toes of both feet firmly on the ground along with the knee. Your head and back should be straight.
  2. Stretch your hands above your head, with hands close to the ears.
  3. Bend back slowly with hands moving backward along with head and chest. Keep a regular breathing until you are able to perfect this asana. Once you are perfect in bending back fully within a few seconds of starting the position, you can inhale while bending back. Otherwise, continue regular breathing.Ustrasana Yoga Pose
  4. Your stretched hands should bend back fully stretched, while the head and torso also follow the hand. In the beginning, you will not be able to bend fully. When you feel uncomfortable, you should return back to the original kneeling position slowly. Try your maximum but do not strain.
  5. With practice, you will be able to bend fully backwards with your hands holding the ankles, head looking up at the sky and chest fully forward. You can hold this position for 4-5 breathes and come back to original kneeling position slowly, exhaling.

Benefits of Ustrasana

Ustrasana improves the core strength of the spinal cord, the hip and the stamina, while improving shoulder flexibility. Flexibility and strength of the organs, especially the spine is very important for a healthy body.

Precautions and Contraindications

When you do this asana, you should be careful about avoiding the collapse of the neck area, since this collapse can compress the blood vessels that bring the blood and oxygen to your brain. If this happens, you can feel dizzy or become unstable, making the entire position unsafe. Most of the beginners of Ustrasana feel a few serious side effects in the beginning, with nausea, lightheadedness and even a feeling of distinct illness. Still, these conditions will slowly decrease with practice and will finally disappear, when you reach perfection.

Categories
Yoga

Setubandhasana : Yoga Pose

setubandhasana-1Setubandhasana is known as the bridge pose. In Sanskrit, Setu means bridge and bandha means binding. Hence, this asana is believed to be a binding bridge between the human body and mind, powerfully uniting the polarities in both. Yoga masters point out that four out of our five senses, namely seeing, hearing, smelling, and tasting are located in our face. This makes us forget about our connection with the body below the head on most occasions to an extent that we remain cut off from our own bodies. Our feet are the farthest from our head. Hence, the Setubandhasana helps us in re-establishing our bond with our feet and our entire body, both inside and outside.

Procedure of Setubandhasana

  1.  The first step in Setubandhasana is to lie on your back, keeping the hands straight on each side, with the palms facing down.
  2. You should slowly bend the knees, with the feet remaining parallel and pressed firmly to the ground, with the distance between them equivalent to the size of your hip. The bending of the knees should be to a level where the heels of the feet just reach the fingertips of your hands.
  3. You should inhale and exhale slowly in this position to relax your body and remove any tension.
  4. You should now press your feet firmly on the ground and lift your spine very slowly, vertebrae by vertebrae. Initially, you may find it difficult to reach the ultimate position, but the final position is when you are resting on the uppermost back vertebrae and your feet, with your fingers touching your heels.
  5. If necessary, you can place your hands on the hips to lift your back in the initial stages, so that the chest is pushed forward and the shoulders bear the burden of the lifted portion of the body, along with the feet.
  6. In this position, you will easily be able to feel the expansion and opening up of your chest and the connection and energy that the spine receives from this pose. This is the actual effect of the binding effect from this bridge pose, aptly named as Setubandhasana.
  7. You can hold this pose for 2-3 breathes and then slowly lower your body again vertebrae by vertebrae until you are again flat on your back.
  8. You can now stretch your arms and knees to lie fully prone on the floor before you start repeating this asana again. When you relax, you will feel the energy flowing into your chakras and through your entire body.

setubandhasana-1

Variations of Setubandhasana

You can hold your hips when you have reached the final position and then lift one leg slowly until that leg is fully perpendicular at 90o ot your other leg, while keeping the other firmly on the ground. You can repeat it with the other leg, after returning the raised leg slowly to the ground.

Benefits of Setubandhasana

Since Setubandhasana is a back bending posture, it stretches the back, spine, neck and chest. Further, the stretching also stimulates the abdominal organs, the lungs, and the thyroid gland, strengthening them effectively. It increases the flexibility of the spinal cord. Further, the Setubandhasana also helps in handling the following conditions.

  • Stress
  • Anxiety
  • Mild depression
  • Insomnia
  • Sinusitis
  • High blood pressure
  • Headache and backache
  • Indigestion
  • Osteoporosis
  • Menstrual discomfort and menopause
  • Tired legs
  • Fatigue

The legs and feet should be parallel and you should avoid squeezing your buttocks very tightly when doing this asana. Further, you should ensure that the throat, neck and jaw are relaxed when you are lifting the body. You should also do one or two forward bending counter poses after this asana. Your yoga master will be able to guide you in becoming perfect in this asana.

Categories
Yoga

Dhanurasana : Yoga

dhanurasana yoga poseDhanurasana is known as bow posture, since Dhanur means bow in Sanskrit and asana is posture. This asana is also termed as Urdhva Chakrasana or upward wheel pose by a few yoga masters.

Procedure of Dhanurasana

You should lie down flat on your belly. You should grasp each foot with each hand at ankle level after folding the legs at the knee level. Then you should slowly lift the legs as well as your torso and head from the ground, while inhaling. This would result in you looking like a bow with only your belly supporting your entire body in this bent position. After holding the position for 4 to 5 breaths, you can come back to the original position of lying on your belly fully stretched and you should exhale while returning to the original position.

Dhanurasana is basically a back bending asana. Hence, you should follow up Dhanurasana with either Sarvangasana or Halasana, since both are powerful forward bending asanas. For every asana in yoga, doing a counter asana is very important.

Benefits of Dhanurasana

When you practice Dhanurasana, you achieve great level of backward extension of your spine and you do this with the help of the muscles in your back. You should not use your arms as leverage. This corrective procedure makes the spinal cord supple and flexible and the back muscles, the leg muscles and the muscles in the arms also get strengthened.

Precautions

If you are having cardiac or abdominal problems, then you can do this asana very slowly and to a limited extent. Still, it is advisable to have a yoga master at hand when you practice Dhanurasana.

Categories
Yoga

Bhujangasana : Yoga

Bhujangasana-yoga poseBhujangasana is known as cobra pose since Bhujanga is snake or serpent in Sanskrit.

Procedure of Bhujangasana

  1. You should lie down on your stomach, keeping the forehead resting on the ground. The toes should be kept flat on the floor.
  2. You should keep both legs very close to each other, with the feet and the heels touching each other lightly.
  3. You should place your hands under your shoulder with palms facing downwards, while keeping your elbows close to and parallel to your chest.
  4. You should inhale deeply while slowly lifting your head, torso and the front portion of your abdomen off the floor by using both arms as support for lifting. Your navel should be in touch with the floor, but ever body portion above the navel should be lifted up as much as possible.
  5. You should ensure that the pressure on both palms is equal.
  6. Even while slowly inhaling, you should lift your body so that the spine gets curved vertebra by vertebra. This asana is a very slow process for maximum effect. You can arch your back as much as possible by straightening your arms. Your shoulders should be away from your ears, and the shoulders should be completely relaxed. Initially, you may have to bend your elbows a little, but you will be able to stretch your elbows and straighten them fully.
  7. You should keep your feet very close to each other, touching lightly during the above steps. You can continue to breathe slowly and hold the position for as long as you can without feeling any discomfort.
  8. You should slowly bring back your abdomen, your chest and your head back to the floor, while exhaling slowly.
  9. You should never overdo the stretching or strain your back too much.

bhujangasana-large

Benefits of Bhujangasana

  • Bhujangasana opens up the neck and shoulder area.
  • Bhujangasana tones up the abdomen and the abdominal muscles.
  • Bhujangasana strengthens the shoulders and the entire back, making the spine supple and flexible.
  • Bhujangasana expands your chest and improves your blood circulation.
  • Bhujangasana enhances the flexibility of the middle and upper back.
  • Bhujangasana reduces stress and fatigue.
  • Bhujangasana is highly beneficial for people suffering from respiratory disorders like asthma, but you should not practice this asana when you are under the attack of such disorder.

Contraindications for Bhujangasana

You should not do Bhujangasana if you have recently undergone abdominal surgeries like the hernia or appendicitis, or pregnant, or if you have fractured wrists or ribs. If you have encountered spinal disorders or chronic diseases in the past, you should practice Bhujangasana only under the guidance of an expert yoga master.