Ayurved Doctor

Categories
Yoga

Vriksasana : Yoga Pose

Vriksasana is termed as tree pose, since Vriksa in Sanskrit means tree. The Buddha commented once that dualities in life, such as gain or loss, pleasure or sorrow, and praise or blame will come and go in our lives like strong winds, but we should remain like a giant tree and stand firm in the midst of such winds. Vriksasana is meant to bring balance in our body and it is one of the initial asanas that should be practiced before a yoga student ventures into other asanas. Many yoga practitioners also use Vriksasana to bring themselves into normal focus after doing the other intense standing postures or asanas.

Balance of ease and effort is the most important factor in Vriksasana. If you try to hold yourself very tight in Vriksasana, the pose will become rigid and you will find it difficult to balance yourself. Further, tension will creep in both your body and mind. If you are too easy in this position, you will not be able to hold the pose, the lifted foot will slip, the supporting leg will tire quickly and the lower back area will undergo more strain when the chest slump. Hence, ideally you should energize yourself enough to hold proper alignment, while remaining soft enough so that the body stays balanced and the mind is able to focus and relax.

Procedure for Vriksasana

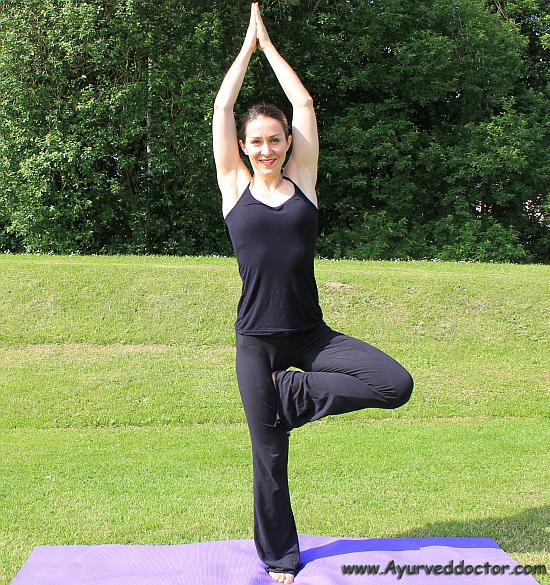
You can proceed to Vriksasana from Tadasana. You should shift weight onto one leg, say the left leg, with the entire sole of the left foot remaining in full contact with the ground. You should now bend the right knee and place the right foot on your inner thigh, like in a half lotus position, inhaling slowly when you move the right leg. In the initial stages, you can use your hands to place your right foot on the left inner thigh. The toes of the right foot should point directly downwards. The left foot, the center of your pelvis, the shoulders and your head should remain firm in a vertical alignment. You can raise your hands above the head along the ears with or without clasping them together or you can clasp your hands in front of your chest like the worshipping or Anjali Mudra. You can remain in this position between 20 seconds and 60 seconds. You can then return to standing pose or Tadasana while slowly exhaling. You can repeat this Vriksasana on the other leg.

Benefits of Vriksasana

Vriksasana improves body balance, poise, posture and concentration. It further increases the range of possible motion in your hip, deepens your thorax, strengthens your ankles, and tones up the muscles in your legs, chest and back. Vriksasana also strengthens your calves, thighs and spine. It stretches the inner thighs, groins, shoulders and chest. Vriksasana reduce flat feet and relieves sciatica.

Vriksasana

Precautions and Contraindications

If you are suffering from high blood pressure, you may face some risk if you raise your hands above your head. Such persons can hold the hands clasped at chest level in Anjali mudra. People suffering from low blood pressure, insomnia or headache should avoid this asana.  You should avoid leaning towards one side, rotating or bending the knee that is supporting your body outward, pushing one hip outwards, losing concentration and looking downwards.

Categories
Yoga

Prasarita Padottanasana : Yoga Pose

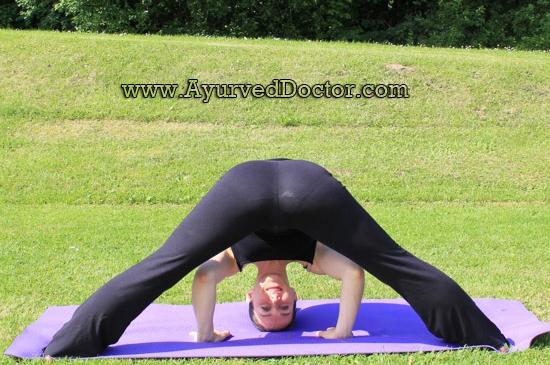
Prasarita Padottanasana is a forward bending asana in which the legs are kept wide. Hence, it is known as wide legged forward bending posture. After doing a few demanding asanas, especially backward bending asanas, you can do Prasarita Padottanasana to align, soothe and rebalance the body and mind. This asana is an ideal counter asana to all backward bending asanas.

Procedure of Prasarita Padottanasana

  • From a standing position, you should inhale and jump off the right foot, so that you land in a position of wide stance.
  • When you outstretch your hands, the feet should be nearly under the hands as much as possible with the feet parallel to each other.
  • You should ensure that your feet remain strong with your inner arches lifted by drawing the inner ankles up.
  • The big toes should be on the floor and outer edge of the feet firm.
  • You can draw your thighs up and engage them for the next position.
  • If possible, you can move your hands so that the palms are behind your back and the fingers of the hands clasped together. If you find this position somewhat difficult initially, you can hold your opposite elbows with your hands.
  • You should now inhale to lengthen the front portion of your body and exhale to fold forward from your hips. The back should remain straight and the chest fully open. You should slowly take the top of your head towards the floor.
  • If you have your hands clasped behind the back, the arms should also move towards the floor with the head all the way. You will be able to feel a good sensation on the backside of your shoulder blades.
  • When you are fully bent forward, you can release your head down and place the crown of the head with a lengthening neck on the floor.
  • You can move your hands from behind the back and place them close to your head on the floor on either side or move them to hold the big toes of your feet. You can also move your hands to hold the hips when the head is touching the floor or stretch your hands behind your back as far as you can move them.
  • You can maintain this pose for 5 to 10 breaths.
  • It is very important to keep the back and the front portion of your body open as long as possible. However, you should be careful that your hamstrings do not get overstretched.
  • You should inhale slowly and lift your back up by putting the pressure on your feet to come out of this posture.

Prasarita Padottanasana yoga pose

Benefits of Prasarita Padottanasana

Prasarita Padottanasana stretches the inside of your legs and your back. It opens up your hip. It also stretches your spine, chest and shoulders. It relieves mild headaches. Prasarita Padottanasana calms your mind, tones up the internal organs, provides more energy to the lungs and the heart, strengthens your legs and exercises the knee joints and hips effectively.

Categories
Yoga

Ustrasana : Yoga Pose

Ustrasana is a back bending asana. In Sanskrit, Ustra means camel and hence this asana is known as camel pose. Since many of us are not accustomed to any activity related to bending backwards, most backward bending asanas will be difficult to perform, but they are highly critical in yoga asanas, since they are the most beneficial to humans.

Procedure of Ustrasana

  1. You should first sit in a kneeling position, with legs apart by about 1½ feet the toes of both feet firmly on the ground along with the knee. Your head and back should be straight.
  2. Stretch your hands above your head, with hands close to the ears.
  3. Bend back slowly with hands moving backward along with head and chest. Keep a regular breathing until you are able to perfect this asana. Once you are perfect in bending back fully within a few seconds of starting the position, you can inhale while bending back. Otherwise, continue regular breathing.Ustrasana Yoga Pose
  4. Your stretched hands should bend back fully stretched, while the head and torso also follow the hand. In the beginning, you will not be able to bend fully. When you feel uncomfortable, you should return back to the original kneeling position slowly. Try your maximum but do not strain.
  5. With practice, you will be able to bend fully backwards with your hands holding the ankles, head looking up at the sky and chest fully forward. You can hold this position for 4-5 breathes and come back to original kneeling position slowly, exhaling.

Benefits of Ustrasana

Ustrasana improves the core strength of the spinal cord, the hip and the stamina, while improving shoulder flexibility. Flexibility and strength of the organs, especially the spine is very important for a healthy body.

Precautions and Contraindications

When you do this asana, you should be careful about avoiding the collapse of the neck area, since this collapse can compress the blood vessels that bring the blood and oxygen to your brain. If this happens, you can feel dizzy or become unstable, making the entire position unsafe. Most of the beginners of Ustrasana feel a few serious side effects in the beginning, with nausea, lightheadedness and even a feeling of distinct illness. Still, these conditions will slowly decrease with practice and will finally disappear, when you reach perfection.

Categories
Yoga

Setubandhasana : Yoga Pose

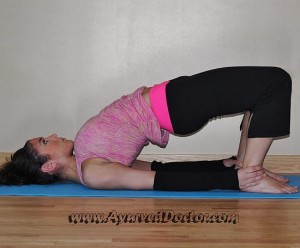
setubandhasana-1Setubandhasana is known as the bridge pose. In Sanskrit, Setu means bridge and bandha means binding. Hence, this asana is believed to be a binding bridge between the human body and mind, powerfully uniting the polarities in both. Yoga masters point out that four out of our five senses, namely seeing, hearing, smelling, and tasting are located in our face. This makes us forget about our connection with the body below the head on most occasions to an extent that we remain cut off from our own bodies. Our feet are the farthest from our head. Hence, the Setubandhasana helps us in re-establishing our bond with our feet and our entire body, both inside and outside.

Procedure of Setubandhasana

  1.  The first step in Setubandhasana is to lie on your back, keeping the hands straight on each side, with the palms facing down.
  2. You should slowly bend the knees, with the feet remaining parallel and pressed firmly to the ground, with the distance between them equivalent to the size of your hip. The bending of the knees should be to a level where the heels of the feet just reach the fingertips of your hands.
  3. You should inhale and exhale slowly in this position to relax your body and remove any tension.
  4. You should now press your feet firmly on the ground and lift your spine very slowly, vertebrae by vertebrae. Initially, you may find it difficult to reach the ultimate position, but the final position is when you are resting on the uppermost back vertebrae and your feet, with your fingers touching your heels.
  5. If necessary, you can place your hands on the hips to lift your back in the initial stages, so that the chest is pushed forward and the shoulders bear the burden of the lifted portion of the body, along with the feet.
  6. In this position, you will easily be able to feel the expansion and opening up of your chest and the connection and energy that the spine receives from this pose. This is the actual effect of the binding effect from this bridge pose, aptly named as Setubandhasana.
  7. You can hold this pose for 2-3 breathes and then slowly lower your body again vertebrae by vertebrae until you are again flat on your back.
  8. You can now stretch your arms and knees to lie fully prone on the floor before you start repeating this asana again. When you relax, you will feel the energy flowing into your chakras and through your entire body.

setubandhasana-1

Variations of Setubandhasana

You can hold your hips when you have reached the final position and then lift one leg slowly until that leg is fully perpendicular at 90o ot your other leg, while keeping the other firmly on the ground. You can repeat it with the other leg, after returning the raised leg slowly to the ground.

Benefits of Setubandhasana

Since Setubandhasana is a back bending posture, it stretches the back, spine, neck and chest. Further, the stretching also stimulates the abdominal organs, the lungs, and the thyroid gland, strengthening them effectively. It increases the flexibility of the spinal cord. Further, the Setubandhasana also helps in handling the following conditions.

  • Stress
  • Anxiety
  • Mild depression
  • Insomnia
  • Sinusitis
  • High blood pressure
  • Headache and backache
  • Indigestion
  • Osteoporosis
  • Menstrual discomfort and menopause
  • Tired legs
  • Fatigue

The legs and feet should be parallel and you should avoid squeezing your buttocks very tightly when doing this asana. Further, you should ensure that the throat, neck and jaw are relaxed when you are lifting the body. You should also do one or two forward bending counter poses after this asana. Your yoga master will be able to guide you in becoming perfect in this asana.

Categories
Yoga

Dhanurasana : Yoga

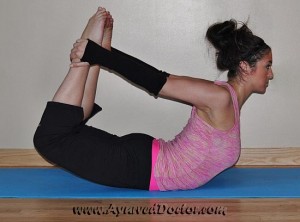
dhanurasana yoga poseDhanurasana is known as bow posture, since Dhanur means bow in Sanskrit and asana is posture. This asana is also termed as Urdhva Chakrasana or upward wheel pose by a few yoga masters.

Procedure of Dhanurasana

You should lie down flat on your belly. You should grasp each foot with each hand at ankle level after folding the legs at the knee level. Then you should slowly lift the legs as well as your torso and head from the ground, while inhaling. This would result in you looking like a bow with only your belly supporting your entire body in this bent position. After holding the position for 4 to 5 breaths, you can come back to the original position of lying on your belly fully stretched and you should exhale while returning to the original position.

Dhanurasana is basically a back bending asana. Hence, you should follow up Dhanurasana with either Sarvangasana or Halasana, since both are powerful forward bending asanas. For every asana in yoga, doing a counter asana is very important.

Benefits of Dhanurasana

When you practice Dhanurasana, you achieve great level of backward extension of your spine and you do this with the help of the muscles in your back. You should not use your arms as leverage. This corrective procedure makes the spinal cord supple and flexible and the back muscles, the leg muscles and the muscles in the arms also get strengthened.

Precautions

If you are having cardiac or abdominal problems, then you can do this asana very slowly and to a limited extent. Still, it is advisable to have a yoga master at hand when you practice Dhanurasana.

Categories
Yoga

Bhujangasana : Yoga

Bhujangasana-yoga poseBhujangasana is known as cobra pose since Bhujanga is snake or serpent in Sanskrit.

Procedure of Bhujangasana

  1. You should lie down on your stomach, keeping the forehead resting on the ground. The toes should be kept flat on the floor.
  2. You should keep both legs very close to each other, with the feet and the heels touching each other lightly.
  3. You should place your hands under your shoulder with palms facing downwards, while keeping your elbows close to and parallel to your chest.
  4. You should inhale deeply while slowly lifting your head, torso and the front portion of your abdomen off the floor by using both arms as support for lifting. Your navel should be in touch with the floor, but ever body portion above the navel should be lifted up as much as possible.
  5. You should ensure that the pressure on both palms is equal.
  6. Even while slowly inhaling, you should lift your body so that the spine gets curved vertebra by vertebra. This asana is a very slow process for maximum effect. You can arch your back as much as possible by straightening your arms. Your shoulders should be away from your ears, and the shoulders should be completely relaxed. Initially, you may have to bend your elbows a little, but you will be able to stretch your elbows and straighten them fully.
  7. You should keep your feet very close to each other, touching lightly during the above steps. You can continue to breathe slowly and hold the position for as long as you can without feeling any discomfort.
  8. You should slowly bring back your abdomen, your chest and your head back to the floor, while exhaling slowly.
  9. You should never overdo the stretching or strain your back too much.

bhujangasana-large

Benefits of Bhujangasana

  • Bhujangasana opens up the neck and shoulder area.
  • Bhujangasana tones up the abdomen and the abdominal muscles.
  • Bhujangasana strengthens the shoulders and the entire back, making the spine supple and flexible.
  • Bhujangasana expands your chest and improves your blood circulation.
  • Bhujangasana enhances the flexibility of the middle and upper back.
  • Bhujangasana reduces stress and fatigue.
  • Bhujangasana is highly beneficial for people suffering from respiratory disorders like asthma, but you should not practice this asana when you are under the attack of such disorder.

Contraindications for Bhujangasana

You should not do Bhujangasana if you have recently undergone abdominal surgeries like the hernia or appendicitis, or pregnant, or if you have fractured wrists or ribs. If you have encountered spinal disorders or chronic diseases in the past, you should practice Bhujangasana only under the guidance of an expert yoga master.

Categories
Yoga

Trikonasana : Yoga

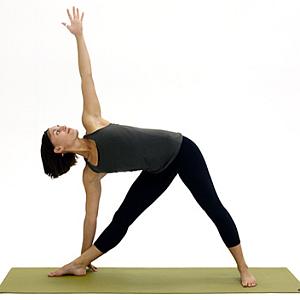
trikanasana yoga poseTrikonasana is known as triangle pose since Tri in Sanskrit means three, Trikona means triangle. Meaning of asana is pose or seat. The various yoga schools have marginally differing views on Trikonasana and its performance procedure. An article appeared in Yoga Journal on Trikonasana, with five leading Hatha yoga tradition teachers giving instructions on the asana. The five were from Shivananda Yoga, Iyengar Yoga, Kripalu Yoga, Ashtanga Vinyasa Yoga and Bikram Yoga. The instructions from each one varied slightly regarding the body positioning in Trikonasana. The main reason is that many yoga sources do not treat Trikonasana as a separate asana but list it under Utthita Trikonasana or Extended Ttriangular Pose. However, the basic fact remains that Trikonasana has its variations like Utthita Trikonasana, Baddha Trikonasana or bound triangular pose and Parivrtta Trikonasana or revolved triangular pose, etc.

Procedure for Performing Trikonasana

You can do Trikonasana in two parts, facing left first and facing right afterwards. You should stand with your feet kept apart by one leg length. Your knees should remain straight without bending. You should turn your right foot completely towards the outside, but the left foot should be turned inwards to about 45o. Your heels should be kept in line with your hips. You should spread your arms to your sides, keeping them parallel to the ground, with your palms facing down. You should extend your trunk as far as possible towards the right, but only to the extent where you feel comfortable, but the arms should remain parallel to the floor. When your trunk is extended fully to the right, you should drop your right arm so that it reaches and touches the shin or an area or block on the floor to the left side of your right foot. The palm should be down, but flexed.

At this stage, you should extend your left arm vertically, while you gently twist your trunk and spine counterclockwise, which is turning them slowly upwards to your left side, since they are nearly parallel to the right. You will have to use the extended arms as levers in this procedure since the spine should remain parallel to the ground during this maneuver. You should now stretch your arms as far away as possible from one another. Your head should usually be turned to gaze on your left thumb, which will slightly intensify the spinal twist. After holding this position for 4-5 breaths, you should return to your standing position and repeat the bend towards the left side.

Variations

The major variations of Trikonasana are Utthita Trikonasana or extended triangular pose, Baddha Trikonasana or bound triangular pose, Baddha Parivrtta Trikonasana or bound revolved triangular pose, Supta Trikonasana or reclining triangular pose, and Parivrtta Trikonasana or revolved triangular pose. However, all the yoga traditions provide only minor differences between these variations and the placement of your lower hand on the ground appears as the reason for these differences, though the different schools do not lay too much emphasis on this aspect. In fact, one yoga school, Satyananda Yoga, describes Trikonasana as a set of 4-5 different asanas that you should perform in a particular sequence.

Benefits of Trikonasana

Trikonasana enhances the flexibility of your spine, corrects shoulder alignments and relieves the backache, indigestion, gastritis, flatulence, and acidity. The asana massages and tones up the pelvic organs, assists in treating neck sprains, strengthens the ankles, tones the ligaments in the arms and legs, reduces stiffness in the shoulders, neck, and knees, and corrects the effects of faulty postures or sedentary lifestyle. In fact, the book from Shivananda Yoga Vedanta Centre mentions that Trikonasana can reduce significantly or even entirely eliminate lower back pain, improve your appetite, digestion and blood circulation, and tone up the abdominal organ and spinal nerves. Another yoga master, Swami Satyananda Saraswati maintains that Trikonasana alleviates nervous depression through the stimulation of the nervous system, tones up the reproductive organs, and strengthens the pelvic region.

Cautions and Contraindications for Trikonasana

If you already have problems with your lower back, the side bend can cause a few issues. Persons with disc herniation will find the twisting quite challenging and even painful. Even people with vertigo issues, dizzy spells or high blood pressure should not look down towards the ground if they do this asana or turn their heads. If you have cervical spondylosis, you should not look upwards for a longer period. If you have a cardiac problem, you can practice against a wall, but should not raise the arm, but allow it to rest on your hip. If you have stress related problems like migraine, headaches, diarrhoea, eye strain, psoriasis, low blood pressure, depression, varicose veins or extreme fatigue should not practice Trikonasana. Further, you should avoid this asana if you are already suffering from any type of back conditions.

The Trikonasana is one of the toughest asanas, and you should practice it only under the proper guidance of a trained yoga master.

Categories
Yoga

Chakrasana : Yoga

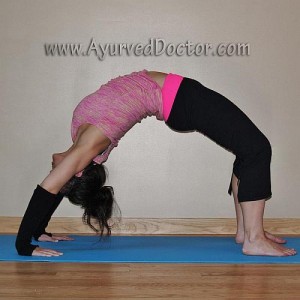
yoga position-ChakrasanaChakrasana is generally termed as wheel pose. It is also known as Urdhva Dhanurasana or upward facing bow pose. Chakrasana is a back bending pose, and it is invariably part of the finishing asana sequences in the main series of Ashtanga Yoga. Chakra means wheel in Sanskrit and asana is a pose, seat or posture. Chakrasana is highly recommended for a flexible spine.

Procedure of Chakrasana

In the general form of Chakrasana, you should have your hands and feet on the ground while the abdomen arches upward to face the roof. The easiest method of getting into this asana is from a supine position. You can also reach this wheel position from a less difficult supine back bending postures like Setu Bandha Sarvangasana or bridge pose. As you become accustomed to Chakrasana from these poses, you can also drop back slowly from Tadasana or mountain pose. If you find it difficult to dropping back in the beginning, you can stand against the wall reach your arms overhead and move your hands down the wall towards the ground, while extending your legs forward to reach this position.

Variations in Chakrasana

Advanced practitioners of yoga asanas follow certain variations to Chakrasana, such as

  • They lift one leg into the air straight up, balancing on one arm and two legs, which is known as Eka Pada Chakrasana or one-legged wheel pose or Eka Pada Urdhva Dhanurasana or one-legged upward facing bow posture. After keeping one leg up in the air for 4 to 5 breaths, they bring down that leg and then do the same with the other leg.
  • They raise one arm off the floor and place it on the thigh or knee, termed as Eka Hasta Chakrasana or one-handed wheel pose or Eka Hasta Urdhva Dhanurasana or one-handed upward facing bow pose. They hold the pose for 4-5 breaths, take the hand back to the original position and repeat it with the other hand.
  • The advanced practitioners also combine Chakrasana with other backbends like Dwi Pada Viparita Dandasana.
  • They also come back to Tadasana by lifting the body slowly off the ground to come to a standing position.

Benefits of Chakrasana

The major benefit of Chakrasana is that the spine becomes highly flexible. A flexible spinal cord is a big protection against back pain, hip pains and many abdominal problems. This asana strengthens the back, the abdomen, the legs and the hands. Agility and flexibility of the body is the major achievement through this asana. However, this is one of the tougher asanas to practice and you should learn it with the help of a trained yoga master.

Categories
Yoga

Yoga : Virabhadrasana III

Yoga asana (Pose)-Virabhadrasana IIIProcedure of Virabhadrasana III

Subsequent to our article on Virabhadrasana II, we are presenting here the third variation in that asana, namely Virabhadrasana III.

You can start Virabhadrasana III either from Tadasana or Adho Mukha Svanasana using certain vinyasas. The procedure of Virabhadrasana III is similar to Virabhadrasana I and Virabhadrasana II, but the position of the hands differ. The steps of performing Virabhadrasana III when you start from Tadasana are as below:

  1. Stretch your arms straight up above your head with hands pressed to the ears and palms facing forward.
  2. Keeping the right leg on the ground, slowly inhale and bend forward until your stretched hands, body and left leg are parallel to the ground.
  3. Your hand head, your chest, your left knee and your left foot should remain aligned in a straight line.
  4. Hold this asana for one to four breaths.
  5. Return to the first step exhaling
  6. Repeat the same procedure with inhaling with the left leg on the ground and the right leg stretched along with hands and body parallel to the ground.
  7. On completion of Virabhadrasana III on the left leg, exhale and return back to Tadasana position.

You can deepen this asana by moving your arms to the sides or by pointing your arms back, with palms facing upward. You can use Mula Bandha and Uddiyana Bandha in Virabhadrasana III also in the same manner which you do for Virabhadrasana I and Virabhadrasana II.

Benefits of Virabhadrasana III

  • Virabhadrasana III tones up the leg muscles.
  • Virabhadrasana III improves posture.
  • Virabhadrasana III contracts the organs in the abdomen, making them internally strong.
  • Virabhadrasana III enhances agility.

All the contraindication and obstacles mentioned in Virabhadrasana I and Virabhadrasana II are equally applicable to Virabhadrasana III also. You should learn these asanas only from a trained and expert yoga master since improper approach can easily result in sprains or damages to other organs.

Categories
Yoga

Yoga : Virabhadrasana II

Virabhadrasana II yoga poseSubsequent to our article on Virabhadrasana I, we are presenting here the other variation in that asana, namely Virabhadrasana II.

Procedure of Virabhadrasana II

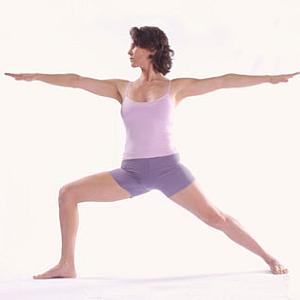
You can start Virabhadrasana II either from Tadasana or Adho Mukha Svanasana using certain vinyasas. The procedure of Virabhadrasana II is similar to Virabhadrasana I but the position of the hands differ. The steps of performing Virabhadrasana II when you start from Tadasana are as under.

  1. Stretch your arms to the side of the body, with hands straight and parallel to the ground and palms facing the ground.
  2. Spread your legs sideways by stepping or jumping while inhaling to create a gap of two-thirds of your body height between the legs
  3. Turn your trunk to face the left side with exhaling, while you rotate the left foot by 90o so that the left foot faces forward and rotate the right foot a little so that it points to the right slightly
  4. Bend the left keen so that your thigh is exactly parallel to the floor but ensure that the bent knee does not get past the ankle. Keep the right leg straight.
  5. Stretch the right leg forward, with the knee fully locked
  6. Your head, your chest, your left knee and your left foot should remain aligned while facing forward
  7. Bend back the head so that your eyes face your outstretched hands
  8. Hold this asana for a period of one to four breaths.
  9. Return to the first step and repeat the same procedure on the other side.
  10. On completion of Virabhadrasana II on both sides, exhale and return back to Tadasana position.

You can deepen this asana by increasing the size of your stride or by reducing the lateral distance between the two feet. You can use Mula bandha and Uddiyana bandha in Virabhadrasana II in the same manner which you do for Virabhadrasana I.

Benefits of Virabhadrasana II

  • Virabhadrasana II tones up the leg muscles.
  • Virabhadrasana II enhances the flexibility of the legs and back.
  • Virabhadrasana II contracts the organs in the abdomen, making them internally strong.
  • Virabhadrasana II helps you in doing advanced forward bending asanas easily.

All the contraindication and obstacles mentioned in Virabhadrasana I are equally applicable to Virabhadrasana II also.